Project based on approved proposal
Due Dates:
Prelim critiques, November 25 and December 4
Final image due at the very latest: December 11
Monday, November 18, 2013
Exhibition
All files to be considered for the exhibition must be turned in by end of class, Monday December 2nd.
Images should be at least 16" x 20" 300 dpi, flattened PSD files.
Images should be at least 16" x 20" 300 dpi, flattened PSD files.
Final Porfolio
Final portfolio will consist of two formats to turn in
Digital
Due: 12/4. All images due, with exception of image(s) for final project
16 jpegs, 1200 pixels longest side, high quality.
Naming protocol:
lastname_project_number.jpg
Examples:
jordan_fieldtripone_1.jpg
jordan_fieldtripone_2.jpg
jordan_project2.jpg
Images can be pulled from any assignment or project from the course. Images must have been shot for the course. All project images must be represented in the portfolio.
Images should be the very strongest produced in the course. Revisions to project images are welcome. If so, please indicate that they are revisions in their title. For example: Jordan_proj2_rev.jpg
Printed
Due: 12/11
Of the above images, create 6 high quality prints. Please include all project images in your selections, including final. Prints should be professionally presented, either window matted or sleeved in a portfolio book.
Also add a jpeg of your final project image(s) to your digital submission, now that it is completed.
Print quality is important
Wednesday, October 23, 2013
Project 2: Using the Human form for Art


© 2012 Heather Orlando
Dates:
Proposal: Monday, 10/28
Prelim: Monday, 11/4
Final: Wednesday, 11/13
Create a body of work that explores the human form in some way. These can be portraits, abstractions of the body, nudes, theatrical, conceptual, or other. Worked toward a cohesive group of images that are aesthetically and conceptually related. Plan to submit between 5-7 final images, in print form as well as digital (jpegs 1200).
Create most appropriate studio lighting design to support your images.
Proposals should be 1 page, referencing the work of two established artists as inspiration
Work will be evaluated on the following criteria:
Work will be evaluated on the following criteria:
- Original, inspiring, and creative idea/vision/approach
- Quality of lighting design
- Quality of photographic design
- Technical (camera, lighting, file management, etc.)
- Deliverables (prints, files, etc.)
- Growth of the project over the course of the assignment
Proposals, prelim and final critiques will be graded.
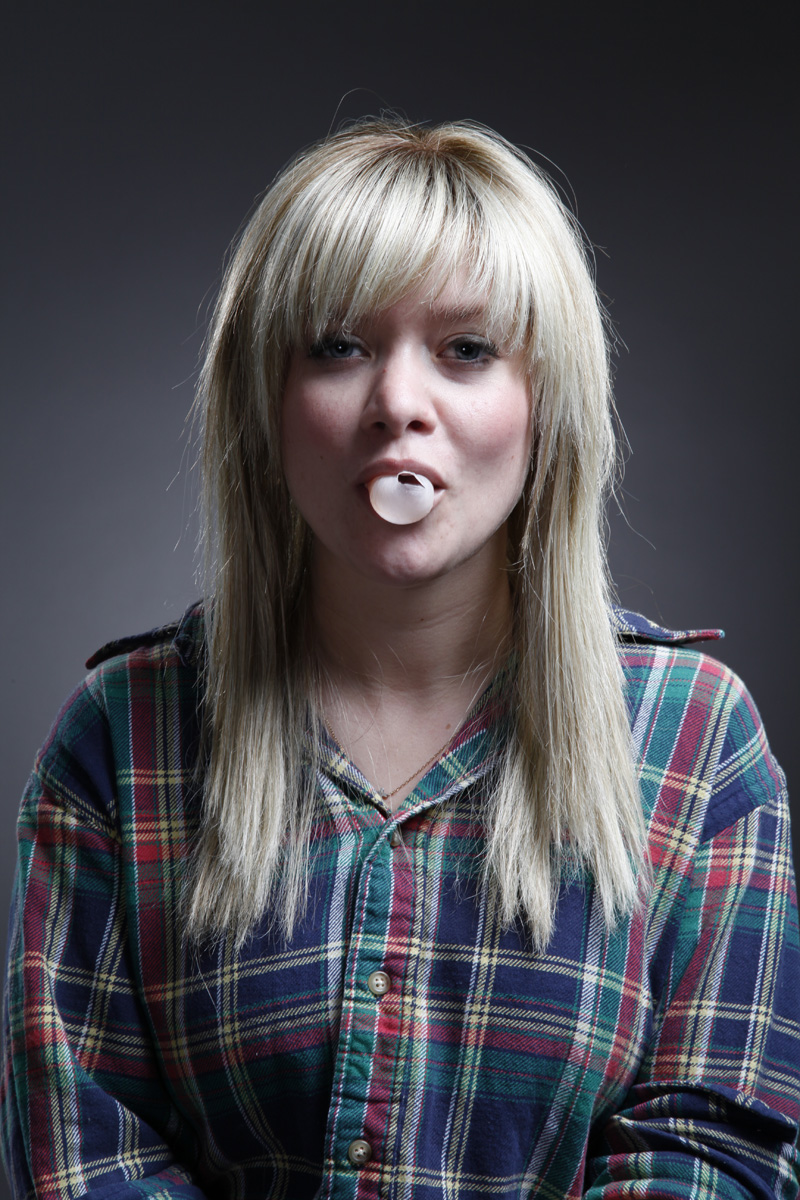
Portrait Exercise 3: Multiple Light Low Key, Multiple Light High Key
Due: Wednesday 10/30
Based on the demo and reading (pages 206-223) create both a low key portrait and high key portrait. Develop images to a portfolio level. Images can be related, in some way, to your figure project, but should be distinct from them. For instance, perhaps you might use the same subject, but for this exercise, images should be more in the realm of a formal portrait.
Based on the demo and reading (pages 206-223) create both a low key portrait and high key portrait. Develop images to a portfolio level. Images can be related, in some way, to your figure project, but should be distinct from them. For instance, perhaps you might use the same subject, but for this exercise, images should be more in the realm of a formal portrait.
Sunday, October 20, 2013
Monday, October 14, 2013
Portrait 1: Key Light quality and placement
Due: 10/21
The first portrait project explores how size, quality and placement of the key light can affect the rendering of the face. This is one of the most important concepts of portrait lighting design. Please read pages 193-206 for further discussion and visual examples.
Take your time with it. Correct exposure, appropriate f-stop, focus are all important.
Create portfolio worthy portraits that explore the following:
- Fairly tight framing that features head and shoulders, without cutting them off.
- Black background. Hint: create adequate distance between subject and background material
- Thoughtful styling...put some planning in and go for it. Move beyond silly mug shots.
- Use of single light source, no fill light. Reflector okay.
For each of the following, create both high and low contrast examples, positioning the key light as necessary.
- Explore 45/45 lighting, sometimes known as Rembrandt, achieving what is referred to in the book as the "key triangle."
- Side lighting
- Front lighting
- Short Lighting
- Broad Lighting
Monday, October 7, 2013


Tuesday, October 1, 2013
Hi Key, Metallic, Family of Angles
Due: Monday 10/7
This week we explore how to optimize the surface appearance of metallic and/or highly glossy surfaces. This applies to opaque ceramics as well, but not for glass, as glass is transparent. For this assignment, create two portfolio worthy images that explore the following two lighting designs and arrangements.


2) Family of Angles exploration. Set metallic object(s) in interesting table-top design with complementary surface treatment. It can help if the surface is non-reflective, or less so than your objects. The camera should be positioned to be looking down on the subject. Place the large light source (generally soft box) within the family of angles so that surface reflections are maximized. The class example looked much better in B&W...you can do the same, of course, if it serves you.
This week we explore how to optimize the surface appearance of metallic and/or highly glossy surfaces. This applies to opaque ceramics as well, but not for glass, as glass is transparent. For this assignment, create two portfolio worthy images that explore the following two lighting designs and arrangements.

Above: Nice Lighting
Below: yucky lighting

1) Vertically-oriented, standing metallic object(s) appropriately lit in front of correctly lit high key background. Remember, set the background light to be 2-3 stops overexposed. Keep the background at least 3-6 feet away from the subject platform to maintain separation.
With the class example above, a grid spot was used for the background. This created a nice fall-off/vignette effect on the edges of the image, almost like it was burned-it (it wasn't).
Use a large/broad light source for the subject, and reflectors as required. A reflective table surface can also be nice...as you can see in the example, the effect is interesting. We used a piece of clear plexi on the sheet metal. The color accents can be created with long strip of color construction paper or similar. A dark cloth under the plexi will enhance the reflections further. Generally, the camera angle will be straight on and from the front.

2) Family of Angles exploration. Set metallic object(s) in interesting table-top design with complementary surface treatment. It can help if the surface is non-reflective, or less so than your objects. The camera should be positioned to be looking down on the subject. Place the large light source (generally soft box) within the family of angles so that surface reflections are maximized. The class example looked much better in B&W...you can do the same, of course, if it serves you.
The images will be evaluated on:
- Lighting design, especially handling of reflections
- Quality of still life / background arrangement
- Correct exposure/light intensities
- Camera craft (focus, etc.)
Sunday, September 15, 2013
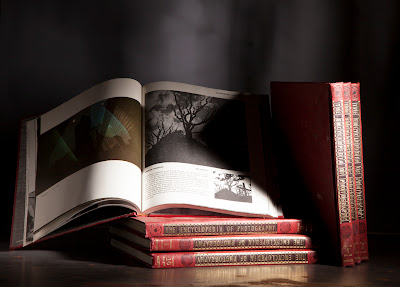
Low Key Still Life

Preliminary Critique: Monday, 9/23
Final Critique: Wednesday, 10/2
Projects will be be evaluated along the following criteria:
- Project explores the subject in an exciting way
- Project is fully explored/realized
- Lighting design(s). Explore and demonstrate a variety of active/passive, contrast, direction, etc.
- Still life design(s)
- Technical skills (camera, photoshop, etc.)
- Prints
Plan to turn in:
- 6 strong, substantially different variations of your still life, jpeg 1200 pixel files
- 2 files, with photoshop layers showing adjustments, jpeg 1200 pixel files
- 3 high quality prints of strongest images, using an inkjet printer, with correct color management. These prints should be created from your full resolution master files, rather than the 1200 pixel screen files
Monday, September 9, 2013
Proposal: Low Key Still Life
Due: 9/16, in class. Be prepared to discuss.
Write a 1-page proposal for a low key still life project. In a low key still life, the image is generally darker, tonally. The background is generally on the darker end of the scale and the lighting design supports deeper shadows.
For this project, please steer away from overly shiny, metallic or glass subjects, for now. These present particular challenges that might be best to avoid for now.
Design a background that supports the subject.
Your proposal should consist of:
- A description of the subject
- A description of the background
- An over idea or concept
- Any particulars regarding the set-up of the still life that you are considering that come to mind (e.g. need to build a stand to prop up objects, or create a GOBO for a certain effect)
- A brief description of at least two still life examples, by well-known, established photographers (choose two different artists) that serve to inspire the set-up and/or lighting design of your project. These examples should be properly referenced
- 1-2 pages
Assignment 4: Qualities of Light, Strobes, Isolated Background
Shooting:
 I. — Flat still life (singular plane, table as background)
 II. — Still life with distant background (lit separately as isolated, second plane)
Subject with designed low-key background. Place object on tabletop and shoot from the front at a low angle, so that the background becomes important in the image. The background should be at least 3 feet behind your subject—move the table toward the middle of the room. This exercise will use two light sources, one for the subject, one for the background.
This assignment will explore some of the important qualities of light. Generally, there are four: Color, Angle, Intensity and Character/Contrast. We will be concentrating on Angle and Character/Contrast for now.
Find an interesting subject that can be photographed on a table-top. Should be solid (relatively) non-glossy/shiny object.
The second part of this assignment will explore how to create an interesting background to compliment your subject. Background design is very important for creating a convincing image that "goes beyond the studio." Bring objects or paper cutouts for use in creating background effects—we will be using them to create GOBOs.
Reserve time in the lighting studio to build and light your shot(s). Shoot with strobes. Plan for at least 2 hours for the assignment. Working with your partner will make things much more productive.
In both exercises, strive to make the most artistically pleasing images as possible.
In both exercises, strive to make the most artistically pleasing images as possible.

Shoot your subject on a piece of seamless or an interesting flat material on the tabletop. Use paper (distressed, painted on, etc.), wood, sheet metal, or anything that will compliment your subject. Most likely, you will be shooting down on your subject. Use and trust your handheld light meter
Light source: Strobe with reflector, barn doors can be useful. Create a series of still life images that show a variation of:
- Angle of Light
- Character/Contrast (Explore hard vs. soft with direct and diffused sources)
- With and without reflecting fill card
 II. — Still life with distant background (lit separately as isolated, second plane)
Subject with designed low-key background. Place object on tabletop and shoot from the front at a low angle, so that the background becomes important in the image. The background should be at least 3 feet behind your subject—move the table toward the middle of the room. This exercise will use two light sources, one for the subject, one for the background.
General concerns:
- Use a low ISO, such as 200
- Shoot RAW, white balance set to strobe
- Shoot manual exposure mode
- Focus critically on the subject using manual focus
- Set shutter speed for 1/60 and forget it...all further exposure adjustments will be made with f-stop
- Design the intensity of the light so that you will be using a moderately wide aperture (say f5.6 or f8). This means the strobes will be turned down. Adjust the strobes down (or up) so that your meter delivers your desired f-stop.
- Move your camera further back from the subject and use a longer lens setting to produce desired framing. This helps reduce distortion of shapes, reduces flare, and helps separate the background
Main Light:
As in the first exercise (above), explore and shoot variations of light direction and intensity
As in the first exercise (above), explore and shoot variations of light direction and intensity
- Varied side or 45º light, shooting variations of angle and height
- Vary contrast (direct versus diffuse), shoot variations
- With and without fill, shoot variations
- Again, set the intensity of the strobe to fire to desired f-stop—generally the strobe will be turned down lower. Meter.
- Similar to last week, direct the main light with barn doors, flags (foam core) or grid so that it doesn't contaminate the background. Background isolation is important for this exercise
Background Light:
- Use barn doors and/or grid spot (10º or 20º)
- Set the light to be at least two stops underexposed. So, if your main light is firing at f8, lower the intensity of the background light so that it meters at f4 (or so). Important: when metering the background light, turn off the main light so that you get an uncontaminated reading
- Angle the light so that it rakes across the background at a low angle
Background Design:
The background will be a simple chiaroscuro effect that should complement the subject without being too distracting. We will have it be out of focus, due to the wider aperture, longer lens, and greater distance behind the subject. This will make it more impressionistic.
The background will be a simple chiaroscuro effect that should complement the subject without being too distracting. We will have it be out of focus, due to the wider aperture, longer lens, and greater distance behind the subject. This will make it more impressionistic.
- Use a piece of seamless, dark cloth, or other kind of dark material against the wall. Attach it so that it doesn't fall down. It will need to be fairly big (like seamless) to function as a backdrop
- Use GOBOs (objects, cutouts, etc.) in front of the light to create interesting shadow play on the background
- Be sure GOBOs themselves do not appear in the shot—we only want to see their shadows on the background
- For sharper shadows, bring object closer to the wall and/or the light further away
Shoot a wide variety of images, exploring the many factors above. Please bring files to next class.
Wednesday, September 4, 2013
Extra Credit: Artist Q&A and/or Exhibition Review


Thursday, September 5th, 6:30 pm, Sella–Granata Gallery, Woods 109
Attend the Artist Talk for "Defining Place" and ask a thoughtful question during the Q&A (10 points) *and/or* write a 1—page, thoughtful review of the exhibition, referencing specific works/projects to support your opinions (10 points)
Do one for 10 points, do both for 20 points
Wednesday, August 28, 2013
Assignment 3: Active versus Passive (ii)

Top light, no diffusion, no fill, gradient sweep backdrop

Top light, no diffusion, with fill, gradient sweep backdrop

Top light, with diffusion, no fill, gradient sweep backdrop

Top light, with diffusion, with fill, gradient sweep backdrop

Active side light, background controlled/blocked
Read: Chapters 1, 2 and 5 (only pages 85-104 (thru "stopping flare"). Be ready to discuss main points.
Create:
Based on the in-class demo and exercise, create an aesthetically strong set of images that explores active versus passive lighting using studio modeling lights.
- Choose an inspiring table-top subject. (Your decision about what to shoot should inspire you. Do go beyond convenience). For now, avoid overly shiny or glass objects, as these present special lighting concerns we will cover later
- Shoot RAW, low ISO (200-400), with a tripod. Use the camera self timer or remote to trigger the exposure, to avoid camera shake. Also, when using a tripod, be sure the lens stabilization is off.
- Use a gradient sweep backdrop (for image with top-light)
- Use a middle range f-stop (f5.6, f8, etc.)
- Focus critically on the subject
- Use hand-held incident light meter reading. Set camera to manual mode so that f-stop and shutter speed can be manually set. Use the combinations indicated by the hand-held light meter.
- Use the following lighting designs to create an aesthetically pleasing image. While some factors, like lighting design, are pre-determined for this study, other considerations like camera angle, composition, zoom/in-camera crop, proper exposure, are all in play for you to optimize
Lighting designs:
- Top light, no diffusion, no fill, gradient sweep backdrop
- Top light, no diffusion, with fill (using reflector), gradient sweep backdrop
- Top light, with diffusion, no fill, gradient sweep backdrop
- Top light, with diffusion, with fill (using reflector), gradient sweep backdrop
- Active side light, background controlled/blocked
Monday, August 26, 2013
Assignment 2: Active versus Passive (i)


Which of the images above displays active light? Passive? Why?
Due Wednesday 8/28
Shoot a variety of images (approximately 36 exposures) that very clearly demonstrate:
- Active Lighting—where the light itself becomes a "lead character" in the drama. Think: "light event"
- Passive Lighting—where the light simply reveals the subject and doesn't draw much attention to itself. Here the light is more of a "supportive character," rather than the "lead"
Use natural light this assignment.
Wednesday, August 21, 2013


Assignment 1


For 8/26 (Monday)
Shooting:
Find instances of natural light that are truly unique events. Go beyond just recording subject matter. Look for interesting effects of light on surface, reflections, shadows, etc. Make pictures that isolate these things. Keep distractions out of the frame. Go on a visual adventure. Morning and late afternoons (a.k.a. the "golden hour") can be nice times to do this. Prepare to discuss what you've found. Shoot many images (50+), plan to show 10.
Tuesday, August 20, 2013
Welcome
The course will present foundational skills in photographic studio lighting. Both natural and artificial light sources will be explored for producing aesthetically and conceptually engaging artworks. A wide range of applications will be explored including still life, portraiture, classic lighting problems, and open creative projects. Experimentation and improvisation are highly encouraged. Topics will reference both historical precedents and contemporary practices. The course will culminate with a portfolio of work.
Examples of student work from recent years:


Subscribe to:
Posts (Atom)